



Installing RKHM on DigitalOcean
Droplet setup, Cloudflare DNS, and optional Spaces
This guide gets RKHM running on a DigitalOcean Droplet. It covers the DigitalOcean choices that matter: the Ubuntu image, SSH access, Cloud Firewall, public IP, DNS, and backups. For Apache, PHP, MariaDB, the RKHM installer, and cron, follow the Ubuntu 24.04 installation guide alongside this page. The baseline is one Droplet with a local MariaDB database; Spaces is an optional addition after RKHM works.
Before you start
- Have a DigitalOcean account, a registered domain, an SSH public key, the complete RKHM release package, and your purchase code. Read RKHM's standard installation steps before uploading files.
- Decide whether RKHM will use
example.comormusic.example.com. Use the same final hostname for DNS, Apache, HTTPS, the installer URL, and the licence. RKHM's licence terms cover domain and IP changes. - Plan capacity for your media library, traffic, image processing, and optional tools. DigitalOcean shows CPU, RAM, disk, and price on the create screen. Check available disk space before importing media; a separate Volume or Spaces bucket is optional and needs its own backup plan.
1. Create an Ubuntu Droplet
In the DigitalOcean Control Panel, choose Create → Droplet. Select a region near your audience, then choose OS → Ubuntu 24.04 LTS. Use the plain Ubuntu image so the package and configuration steps in our Ubuntu guide apply. DigitalOcean's Create a Droplet guide explains the current control panel choices.
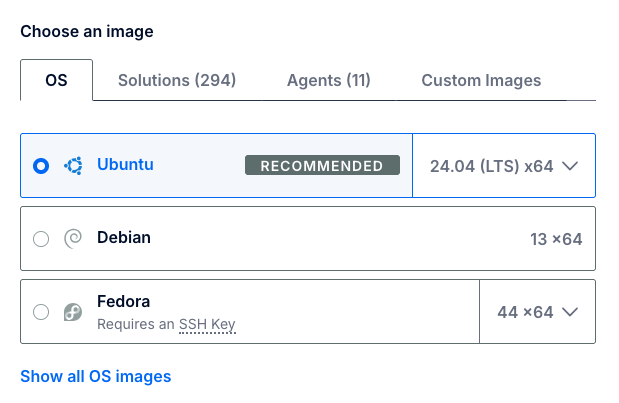
Choose the OS image and select Ubuntu 24.04 LTS. Screenshot: DigitalOcean documentation.
- Choose a Droplet configuration with enough RAM, CPU, and disk for your expected library and processing work. The smallest size is not a universal production recommendation. DigitalOcean offers shared and dedicated CPU plans; measure usage after launch and resize if needed.
- Under Authentication Method, add your SSH public key. DigitalOcean recommends SSH keys and explains how to upload one. Keep the private key on your own computer.
- Enable automated backups and monitoring if those options fit your recovery and observability needs. Backups are billed separately; the create screen shows the price.
- Give the Droplet a recognizable hostname and click Create Droplet. Record the public IPv4 address shown when provisioning completes. The normal public IP is enough for one server. If you need an IP that can later move to another Droplet, assign a Reserved IP before pointing DNS and activating RKHM.
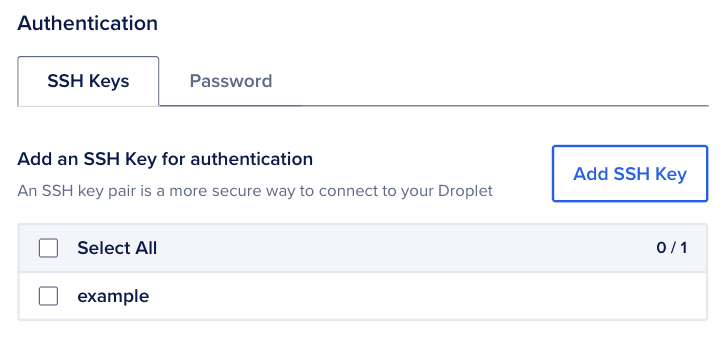
Add your SSH public key during creation. Screenshot: DigitalOcean documentation.
Connect from your computer using the address shown in the Droplet list. Replace the example IP below. If you specified a nondefault private-key file, add -i /path/to/key. DigitalOcean has a Droplet SSH guide. Create a sudo user and secure SSH following DigitalOcean's recommended setup before the public launch.
ssh root@YOUR_DROPLET_PUBLIC_IP2. Add a DigitalOcean Cloud Firewall
Choose Create → Firewall, or go to Networking → Firewalls. Attach the firewall to this Droplet. DigitalOcean's firewall creation guide shows the current controls. Set these inbound TCP rules:
- 22 (SSH): allow your trusted administrator IP or range. Keep an existing SSH session open while narrowing the rule and confirm that a new session can connect.
- 80 (HTTP): allow all IPv4 sources, and IPv6 sources if you use IPv6. HTTP is needed for initial access and common certificate validation.
- 443 (HTTPS): allow all IPv4 sources, and IPv6 sources if you use IPv6. This is the normal public RKHM endpoint.
- Keep MySQL
3306, DigitalOcean Managed MySQL25060, and optional service ports such as Meilisearch7700closed to the public internet. Do not add them as inbound web rules.
DigitalOcean's firewall and Ubuntu's UFW are separate layers. If UFW is enabled, allow SSH, HTTP, and HTTPS there too, as shown in the Ubuntu guide. Leave normal outbound connectivity available for package updates, DNS, HTTPS requests, and services RKHM is configured to call. DigitalOcean explains cloud firewall rules in detail.
3. Point your domain through Cloudflare
Use Cloudflare to manage the domain's DNS. Add your domain to Cloudflare, review the imported records, preserve any mail and verification records you use, then change your registrar's nameservers to the two Cloudflare assigns. Follow Cloudflare's full DNS setup. The registrar can remain where it is; the A record is managed in Cloudflare after the nameserver change.
- For RKHM on the main domain
example.com, create or edit an A record with Name@and IPv4 address equal to the Droplet's public IPv4 or assigned Reserved IPv4. Cloudflare's zone apex guide uses@for the root domain. - For RKHM on
music.example.com, use Namemusicinstead. Cloudflare's subdomain guide shows the pattern. - Set the RKHM A record to DNS only (gray cloud) during setup. Add an AAAA record only if the Droplet has working public IPv6 and your Apache and firewall setup handle it. If Cloudflare already imported an old A record for this hostname, edit or remove the stale one so it does not send visitors elsewhere.
# Main domain example in Cloudflare DNS → Records
Type: A
Name: @
IPv4 address: YOUR_DROPLET_PUBLIC_IP
Proxy status: DNS only

# For music.example.com, use Name: music instead.
Wait for the Cloudflare zone to become active and check that the chosen hostname resolves to the Droplet's IP from another network and from the Droplet itself. @ belongs only in the Cloudflare DNS Name field; use example.com in Apache, certificates, and RKHM. The Ubuntu guide includes Cloudflare screenshots, DNS checks, and the optional www record.
4. Install RKHM on the Droplet
Now work through the RKHM on Ubuntu 24.04 guide from its web stack section onward. Install Apache, PHP 8.3 and required extensions, MariaDB, and cron; create the RKHM database; upload the release to the document root; configure the virtual host and rewrite rules; obtain the HTTPS certificate; run the RKHM installer; remove its installer directory; and set the scheduled task. The standard installation sequence explains the application steps. Use the exact hostname selected above in every command and in the final installer URL.
Use the Droplet's local MariaDB for this documented path. Keep it listening locally and use the database name, user, and password you created in the Ubuntu guide when the RKHM installer asks. You do not need a DigitalOcean Managed Database or a Spaces bucket to launch a working site.
Do the first browser visit with the Cloudflare record still set to DNS only. Confirm that both https://YOUR_HOSTNAME/ and the RKHM API work, the installer reports its requirements satisfied, and the scheduled task runs. If you later enable Cloudflare's proxy, use a valid origin certificate and review Cloudflare's Full (strict) mode; then verify uploads and media playback. The Ubuntu guide has the detailed checks.
5. Optional: put public files in DigitalOcean Spaces
RKHM has an Amazon S3 storage type with a custom endpoint, which can target S3-compatible services such as DigitalOcean Spaces. Set this up after the local RKHM installation works. DigitalOcean's Spaces quickstart and access-key guide cover bucket creation and credentials. Choose a Standard Storage bucket for public, frequently accessed media; choose a nearby region and create an access key scoped to the bucket where possible.
In the RKHM admin area, open Storage, add a storage entry of type Amazon S3, and fill the fields below. Replace nyc3 and rkhm-media with the actual Spaces region and bucket. Use the full https:// endpoint without a trailing slash; the custom address is the public file URL base. RKHM's S3 adapter sends uploads with public-read access, so use this only for files intended to be publicly reachable.
Type: Amazon S3
Amazon Bucket Name: rkhm-media
Amazon Bucket Region: nyc3
Amazon S3 Key: YOUR_SPACES_ACCESS_KEY
Amazon S3 Secret: YOUR_SPACES_SECRET_KEY
Custom Endpoint: https://nyc3.digitaloceanspaces.com
Custom Address: https://rkhm-media.nyc3.digitaloceanspaces.com
Save the storage entry and use its admin Test action if available. Upload a small public image and an audio or video sample, then open their returned URLs and confirm they behave as you expect before routing real media there. The current RKHM S3 adapter sets Content-Disposition: attachment on uploads, which can affect inline playback or display; check this with your actual media and browser. Keep the local storage option available until the result is verified. RKHM's premium files are stored in a private local directory and are not uploaded to third-party storage.
6. Managed MySQL requires a separate compatibility check
DigitalOcean offers a Managed MySQL cluster with a connection hostname, a separate port (commonly 25060), access controls, and SSL required by default. The current RKHM installer asks for a database host, name, user, and password; the underlying MySQLi connection does not explicitly set a TLS CA or SSL connection options. We have not verified a secure end-to-end RKHM installation against DigitalOcean Managed MySQL, so this is not the default recipe for this guide. Use local MariaDB unless you have validated a connector that accepts the managed cluster's port and verified TLS connection and all installation and runtime queries. DigitalOcean's connection guide lists the current parameters.
7. Back up and check the live site
- Keep DigitalOcean automated backups enabled for the Droplet and make separate, restorable backups of the RKHM database and uploaded files. Droplet backups are crash-consistent images, so a database export and a restore rehearsal add confidence for a busy site. See DigitalOcean's backup features.
- If you attach a Block Storage Volume for media or database files, back it up separately: Droplet backups do not include Volumes. Likewise, a Spaces bucket needs its own retention or recovery plan.
- Check the home page, admin sign-in, upload and playback of a representative file, HTTPS, cron output, and free disk space. Review the Ubuntu guide's final checks and optional tools if you enable FFmpeg, WebP, animated GIF conversion, Meilisearch, yt-dlp, or Node.js.
If SSH fails, check the Droplet public IP, SSH key, and Cloud Firewall port 22 rule. If the domain fails, check Cloudflare's active zone and A record, then both the Cloud Firewall and UFW rules for ports 80 and 443. If the RKHM installer cannot reach its own API URL, test DNS and HTTPS from the Droplet itself as described in the Ubuntu guide. If a Spaces upload succeeds but public media cannot be viewed, check its URL, bucket permissions, and returned response headers before using that storage for visitors.