
Native Apps - Building
Compiling and signing your own builds
You can download the fully open-source code, along with all required Cordova plugins and dependencies, as a zip file from CodeCanyon, or from My Licenses if you bought it from our store.
Upon unzipping the zip file, you'll have 3 directories: ios, android, documentation

In android & ios directory, the project’s core code is located in the www folder. Cordova plugins are stored in the plugins folder, while platform-specific files (e.g., Android/iOS configurations) reside in the platforms folder
[Android Only] You won't need to touch any of these folder/files or even download the .zip file if you use our online compiler
New in Cordova V1.1.00: Instead of the CodeCanyon zip you can download an App project (iOS or Android) from Mobile App in your admin area. It is the same app template with your server's current bundle, addresses and key already inside, so most of the manual editing below is not needed.

We'll divide build process into three stages:
1. Configuring RKHM
2. Gathering Required Information and Assets
3. Compiling the Project into .APK or .IPA ( or .APP )
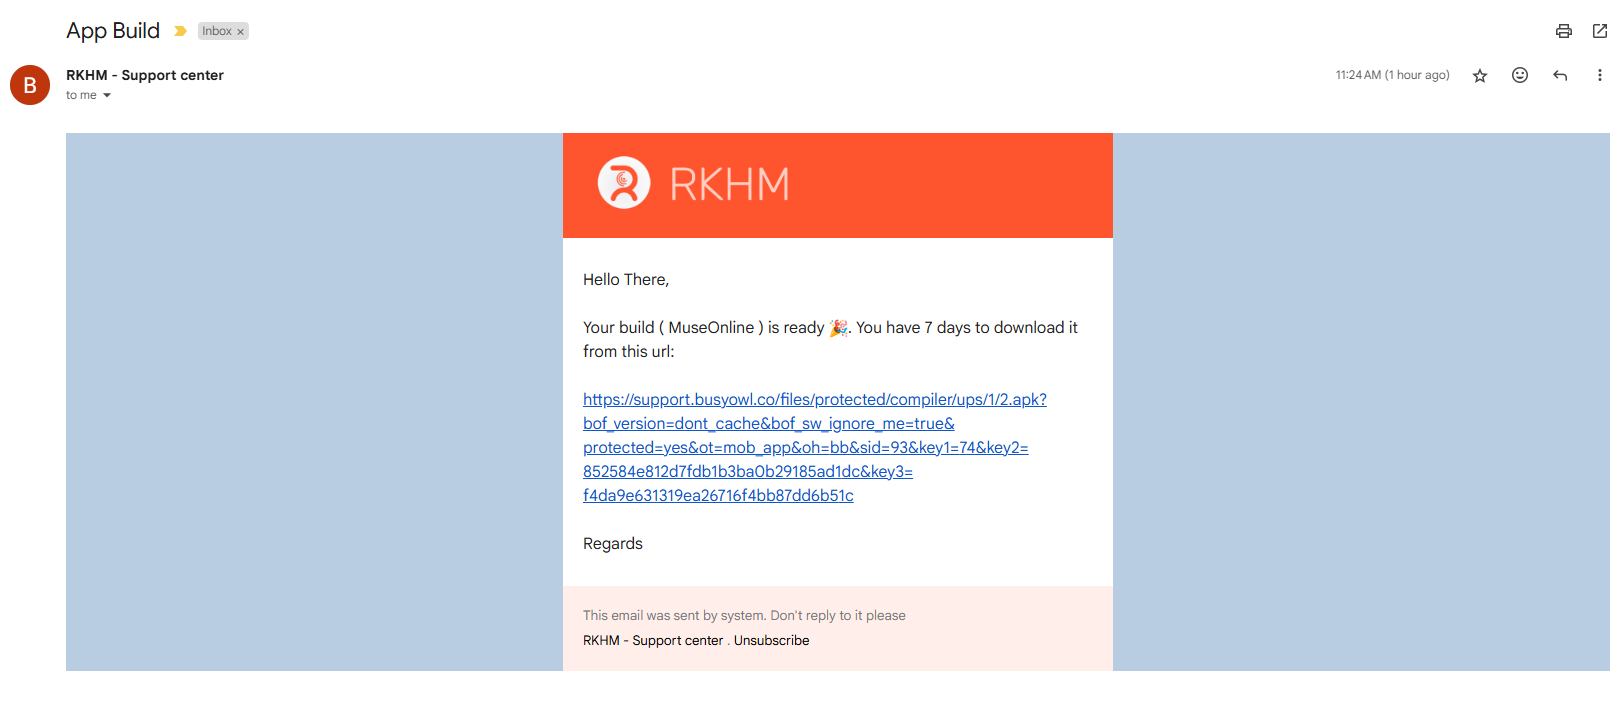
- [Android Only] Automated Compilation: To save time, we’ve spent weeks and developed an online compiler that automates the process. After uploading your files, it generates a ready-to-publish .APK (Android) file within minutes. This tool is free and for 6 months after the purchase from Codecanyon, you can use it once per week.
- Manual Compilation: For full control, follow our step-by-step guide to compile the project yourself using Apache Cordova. This ensures customization and direct access to build settings.
1. Configuring RKHM
Install Hybrid Mobile App as plugin within your RKHM's admin area
Before getting busy with gathering info or building the app, make sure you install "Hybrid mobile app" as a plugin within your RKHM admin area otherwise API won't support the device! Docs Use plugin version 1.1.00 or newer (added in Cordova V1.1.00).
Edit .htaccess file
The .htaccess file in your RKHM's root directory (next to index.php) already contains these three lines. If you replaced or edited that file, make sure they are still at the end of it (turn on "show hidden files" to see it):
Header add Access-Control-Allow-Origin "*"
Header add Access-Control-Allow-Methods "*"
Header add Access-Control-Allow-Headers "*"
Adding these rules should enable CORS requests to your web-server. You can use this tool: https://cors-test.codehappy.dev/ to see if rules are working
Publish your app bundle (added in Cordova V1.1.00)
Open Mobile App in your admin area and press Rebuild bundle. This publishes the screens your app is made from. The online compiler builds your app from this bundle and refuses to start without it. Fill in your store links on the same page: apps that are too old use them to send users to the right store. After that, press Rebuild bundle again whenever you update RKHM, a plugin or your phone theme. See Cordova V1.1.00 for the full routine.
2. Gathering information
Brand Name:
- Prepare your app’s brand details (e.g., name, description, etc.) for configuration
Adaptive Icon:
- Visit icon.kitchen to generate a compliant Android adaptive icon
- Download the generated icon as a .zip file for later use
Splashscreen Logo:
- Prepare a square-shaped (1:1 aspect ratio) logo (PNG format only)
- Ensure 10% padding (empty space around the logo) to avoid cropping
- Rounded logos are allowed, but the base must be square
Theme Color:
- Set your Progressive Web App (PWA) theme color in Setting → Interface → Theme Setting → Color setting
- Note: This setting does not apply to the native app. Provide the same color (or a new one) in #hex format (e.g., #FF5733) for online compiler and RGB for manual compiling
[Android] Google Services Configuration:
- Create your app in Firebase Console (console.firebase.google.com)
- Add an Android project and download the google-services.json file
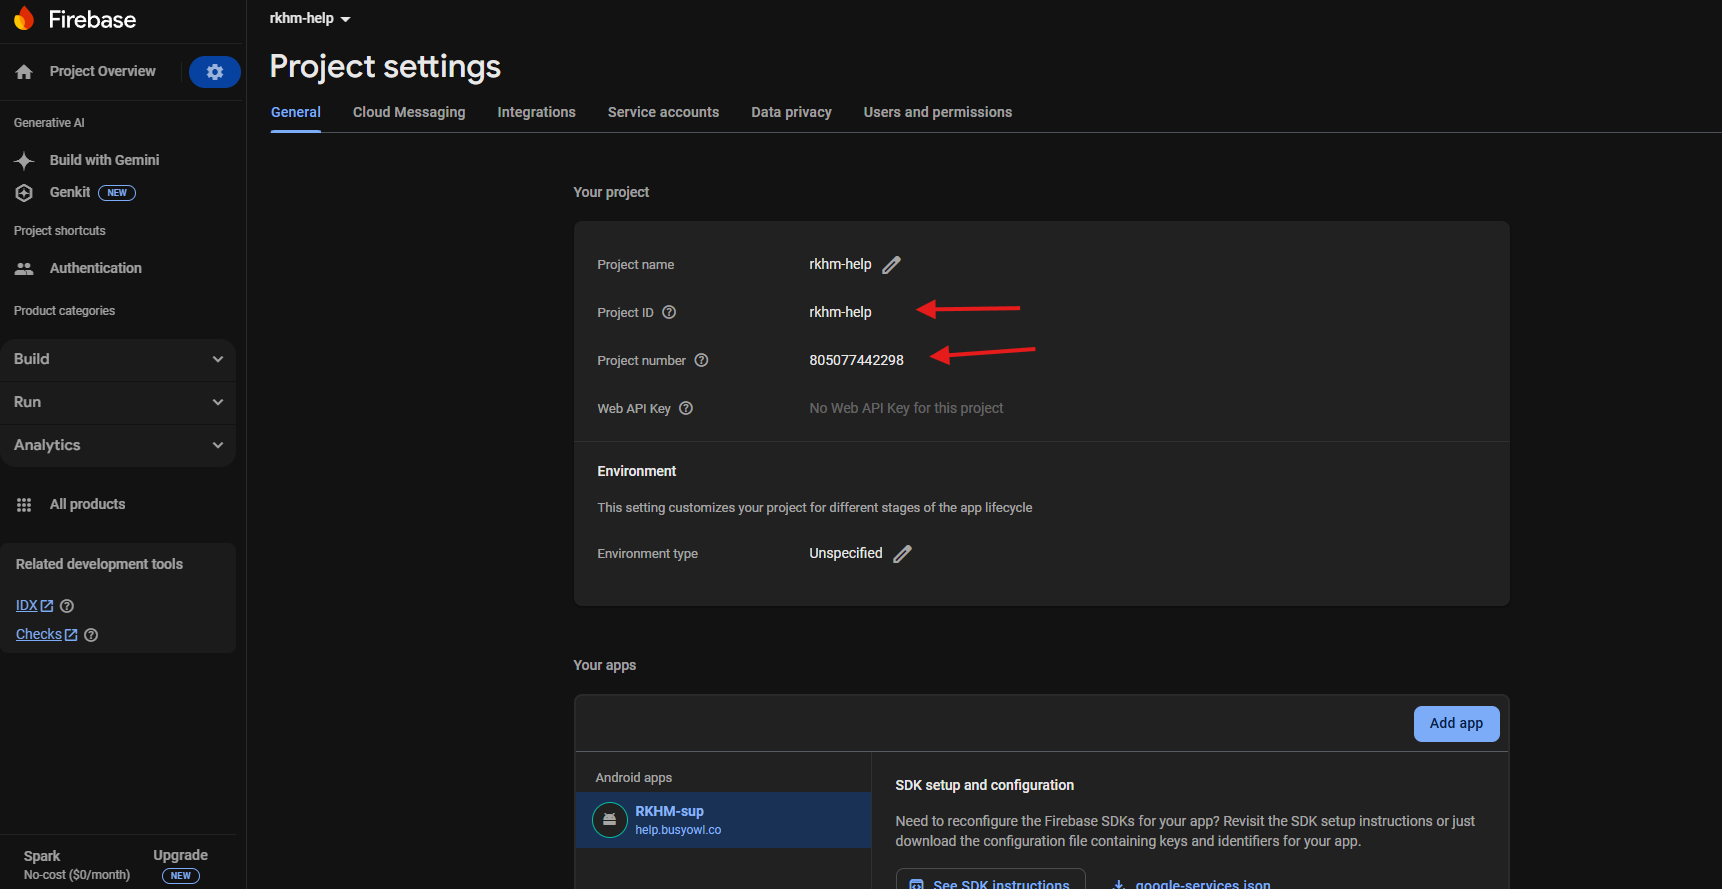
- Copy your Project ID from the Firebase Project Settings page
[Android] Service Account JSON:
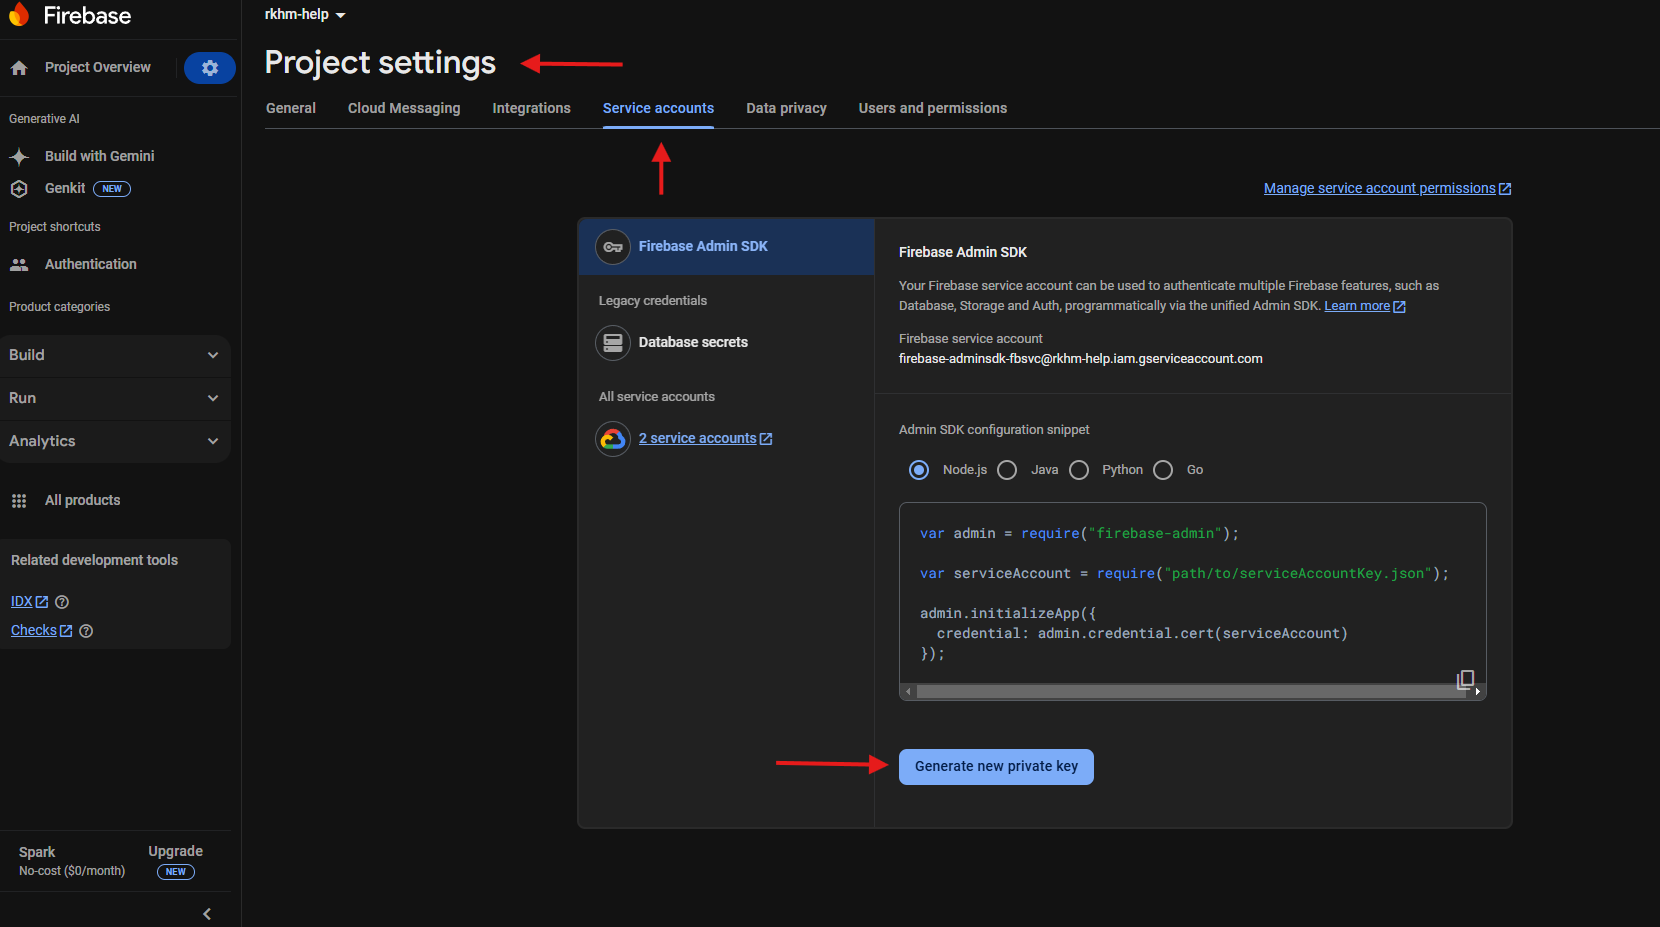
- In Firebase Console, navigate to Project Settings -> Service Accounts
- Click Generate New Private Key to download a .json file
- Important: rename the file to
fcm-service-account.jsonand upload it to your RKHM'sapi/app/folder, then enter your Project ID and Project number under Setting → Notifications → FCM (used for push notifications, not compilation)
[Android][Optional] AdMob App ID
You can display banners & ad-walls inside your Android app. Create your app on https://admob.google.com/home/, verify it and copy your app ID. It should start with ca-app-pub-
[iOS] Apple Developer Account
Create an Apple Developer Account. Make sure to upgrade to premium as some features like "push notification" are not available for free accounts
Create a bundle for your app. Copy team-id & bundle-id
Generate a .p8 APN Auth Key. Copy the key-id
Enter them under Setting → Notifications → APN (Apple Team ID, APN Key ID, App Bundle ID and environment). Rename the .p8 key to apn-AuthKey.p8 and upload it to your RKHM's api/app/ folder.
RKHM Sign-Key & Endpoint Address:
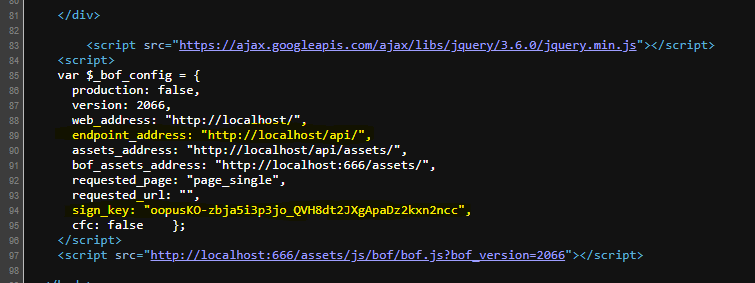
- Endpoint Address: Your website URL + /api/ (e.g., https://yourdomain.com/api/ )
- Sign-Key: Found in your website’s index.html source code (highlighted in comments). The native apps needs this to sign requests to your backend
- Note: The online compiler can automatically detects these — no manual input required
3. Compiling ( Building )
3.a. [Android Only] Auto
For 6 months after you buy the Hybrid Mobile App plugin, you can use our online compiler to build your Android app: one build per week, for one RKHM site per purchase code. Your RKHM license must already be registered to your domain, and that site must be online.
To use it, open the builder page, enter the requested details and click Build My App. We'll email you a signed, release-ready app (.APK, or .AAB for Google Play).
Compiler page: https://my.busyowl.co/deploy_app
What changed in Cordova V1.1.00:
- The compiler first checks that your server has a published bundle (see "Publish your app bundle" above). If not, it tells you what to do and does not start
- Your app is built from your server's own bundle, so it matches your server instead of whatever was last prepared on our side
- Version numbers count up by themselves. Each build of the same app ID gets the next Android version code, so Google Play accepts it. If this app was published before without our compiler, enter your latest version code in the new optional field Last version code you published
- The compiler is still Android only. iOS apps are built by you (see the manual route and the App project download)
3.b. Manual
If you purchased the app more than six months ago, prefer to avoid sharing additional data or you wish to have full-control over compilation and configuration, you can compile the project independently by following the manual compilation steps below
Easier since Cordova V1.1.00: press App project: iOS or App project: Android on the Mobile App page and use the zip it gives you instead of the CodeCanyon project. It already contains your bundle, endpoint address and sign key, plus a PROJECT_README.txt with the few things left to fill in (app ID and name, icons, splash logo, push settings). Build it with:
npm ci --include=dev
cordova platform add android@14.0.1   (or ios@8.1.0)
cordova build android --release       (or cordova build ios)
This route needs Node.js 20+, JDK 17 and the Android SDK Platform and Build-Tools 35 for Android, and a Mac with a current Xcode for iOS. If you use it, skip steps "3. Insert Gathered Assets & Configurations" and the line numbers in it.
You can build your Android app on all major operating systems ( Mac, Linux, Windows ). But you'll need a Mac to build your iOS app. More info
1. Install Cordova & Dependencies
[Android] Prerequisites:
- Node.js & npm: Install from nodejs.org.
- Java JDK 11+: Required for Android builds.
- Android Studio: Install from developer.android.com.
- More information: https://cordova.apache.org/docs/en/12.x-2025.01/guide/cli/installation.html
[iOS] Prerequisites:
- Xcode ( MacOS Only )
- CocoaPods
- Apple Developer Account
- Physical device for testing
- More information: https://cordova.apache.org/docs/en/12.x-2025.01/guide/cli/installation.html
Install Cordova CLI:
npm install -g cordova [Android] Verify Android SDK Setup:
Open Android Studio →SDK Manager→ Install:
- Android SDK Platform 33 (or your target API level).
- Build-Tools 33.0.0 (or latest).
- Android Support Repository, Google Play Services
More information about Android prerequisites: https://cordova.apache.org/docs/en/12.x-2025.01/guide/platforms/android/index.html
[iOS] Xcode Configuration
- After your first Cordova iOS build, navigate to your-project/platforms/ios/ and open the .xcworkspace file (not .xcodeproj) in Xcode
- In Xcode’s Project Navigator, select your project → Signing & Capabilities
- Check "Automatically manage signing" (recommended for simplicity)
- Select your Team (Apple Developer account required)
- Ensure the Bundle Identifier matches your Apple Developer/APNs setup
More information about iOS prerequisites: https://cordova.apache.org/docs/en/12.x-2025.01/guide/platforms/ios/index.html
2. Test Cordova Requirements
Open Powershell on Windows, Terminal on Mac/Linux and navigate to the project folder. Project folder is the extracted zip file you downloaded from Codecanyon
Run one of these based on target platform:
cordova requirements android
cordova requirements ios
Ensure all checks pass (Android SDK, JDK, Gradle).

3. Insert Gathered Assets & Configurations
If you are building the iOS app then www folder below refers to ios/www folder. For android, the documentation is referring to android/www folder
The line numbers in this step belong to the CodeCanyon project. They do not apply to an App project download from Cordova V1.1.00, which comes with these values filled in.
A. Brand Name & Theme Color
- Locate index.html inside www folder
- Line 12 & 168 is where you enter your brand's name
- Line 169 is where you enter the text displayed on login page after the splashscreen
- Line 24 is where you enter your theme color in RGB format
- Locate config.xml next to the www folder
- Line 2 is your app's unique name ( Firebase package name )
- Line 4 is your app's name
- Line 6 is your app's description
- Line 7 is author's website & email ( enter yours )
- Line 8 is author's name
B. Adaptive Icon & Splashscreen
- Unzip your icon.kitchen .zip file.
- Android -> Copy all android/res/mipmap-* folders to www/assets/logos
- iOS -> Copy all ios/AppIcon-*.png files to www/assets/logos
- Place your splashscreen logo (PNG) in www/assets/splash_logo.png
C. [Android] Firebase Configuration
- Copy google-services.json to platforms/android/app folder
D. RKHM endpoints & Sign key
- Locate index.html inside www folder
- Line 160 is where you paste RKHM's endpoint address
- Line 165 is where you enter RKHM's sign key
4. Compile the APK/IPA/APP
[Android][Optional] Add AdMob Plugin
cordova plugin add admob-plus-cordova --save --variable APP_ID_ANDROID=ca-app-pub-*******Replace ca-app-pub-******* with your actual AdMob App ID
Remove target platform and re-add it
cordova platform remove android
cordova platform add android

cordova platform remove ios
cordova platform add ios
[Android] Make sure you copy google-services.json file again
Build the Project:
cordova build android --release

cordova build ios --prod
After compilation, find the .apk/.ipa/.app at:
platforms/android/app/build/outputs/apk/release/app-release-unsigned.apk
platforms/android/app/build/outputs/apk/release/app-release.apk


platforms/ios/build/Debug-iphoneos/{app_name}.ipa
platforms/ios/build/Debug-iphonesimulator/{app_name}.app
5. [Android][Optional] Signing the app
You only need to sign the APK if you’re publishing to app stores like Google Play.
Google’s official signing guide:→ Android Developer Docs: Sign Your App