



Content
Storage
Keeping media off-server on FTP, S3 or Spaces
Officially supported storages:
| Storage option | What to check before choosing it |
| Amazon S3, Bunny.net, Storj, Backblaze, Wasabi, CDN77, Cloudflare R2, DigitalOcean Spaces, Hetzner Object Storage, Oracle Cloud Object Storage, Azure Blob Storage, Google Cloud Storage (DigitalOcean, Hetzner, Oracle, Azure and Google Cloud were added in v2.1.04) | Current storage, transfer, request, and minimum-charge pricing on the provider’s own site |
| Amazon S3 with AWS CloudFront | CloudFront is a delivery service; check the origin storage cost separately |
| MinIO (self-hosted) (added in v2.0.69) | Your own disk, backup, server, and transfer costs |
| FTP server | Your FTP host's storage and bandwidth limits, and the web address the files are served from |
| Local Directory (this server) (added in v2.1.04) | Another folder on this server, such as a second disk: enter an existing directory the web server can write to, and the web address that folder is served from |
Provider prices and limits change. Estimate both stored data and delivery traffic for your expected usage, then check the provider’s current pricing and region-specific terms before you configure storage.
Any AWS or FTP compatible storage works!
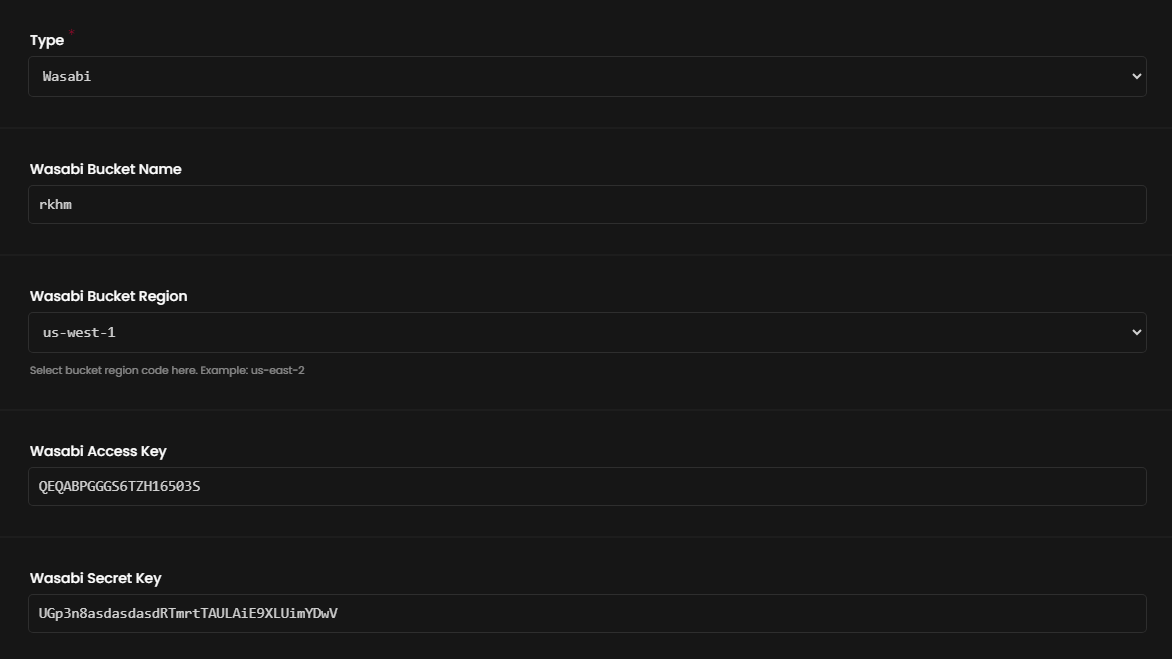
How to add Wasabi?
- Create a bucket. You can set any name or choose any region. enabling Bucket Versioning or Bucket logging is not necessary. Docs
- Enable public access to your bucket. Docs
- Create a new root access key. Copy the Access Key & Secret Key. Docs
- Go to RKHM's `Admin -> Setting -> Files -> Storage Servers` and click on `+ New Item`
- Enter any name, choose Wasabi from `Type` option. Enter required information and click on `create`
- Go to RKHM's `Admin -> Setting -> Files -> Storage Setting` and set your new storage as default storage for ALL files or set it for whatever you like
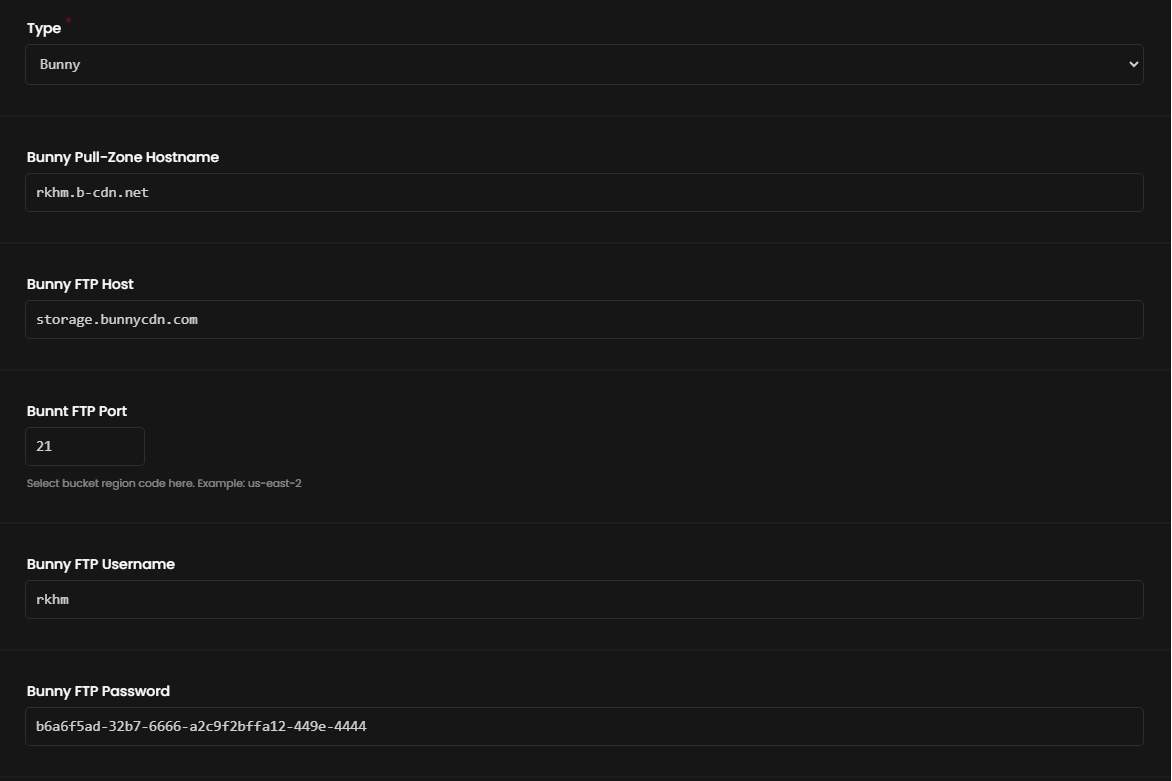
How to add Bunny?
- Create a storage zone ( Bunny dashboard -> Storage -> + Add Storage Zone ). Enter any name. Select `Standard` as Storage tier, you don't need SSD for multimedia storage. Select a region, closest to your users' location. Geo Replication is not necessary
- You are redirected to a new page, Copy your username & password in FTP & API Access page
- Create a pull zone ( Bunny dashboard -> CDN -> + Add Pull Zone ). Enter any name. Select `Storage Zone` as Origin Type and select your Storage zone that you just created. Select `Standard tier` for Choose tier option - unless you have high volume traffic - and choose the location closest to your users' location in Pricing Zones and create the pull zone
- You are redirected to a new page. Copy your hostname from Linked Hostnames. For example: media.b-cdn.net
- If you wish to store HLS-encrypted on Bunny, you should visit your pull-zone, go to "Headers" setting page. Enable "Add CORS headers" and also append m3u8 and ts to "Extension list"
- Go to RKHM's `Admin -> Setting -> Files -> Storage Servers` and click on `+ New Item`
- Enter any name, choose Bunny from `Type` option. Enter required information and click on `create`
- Go to RKHM's `Admin -> Setting -> Files -> Storage Setting` and set your new storage as default storage for ALL files or set it for whatever you like
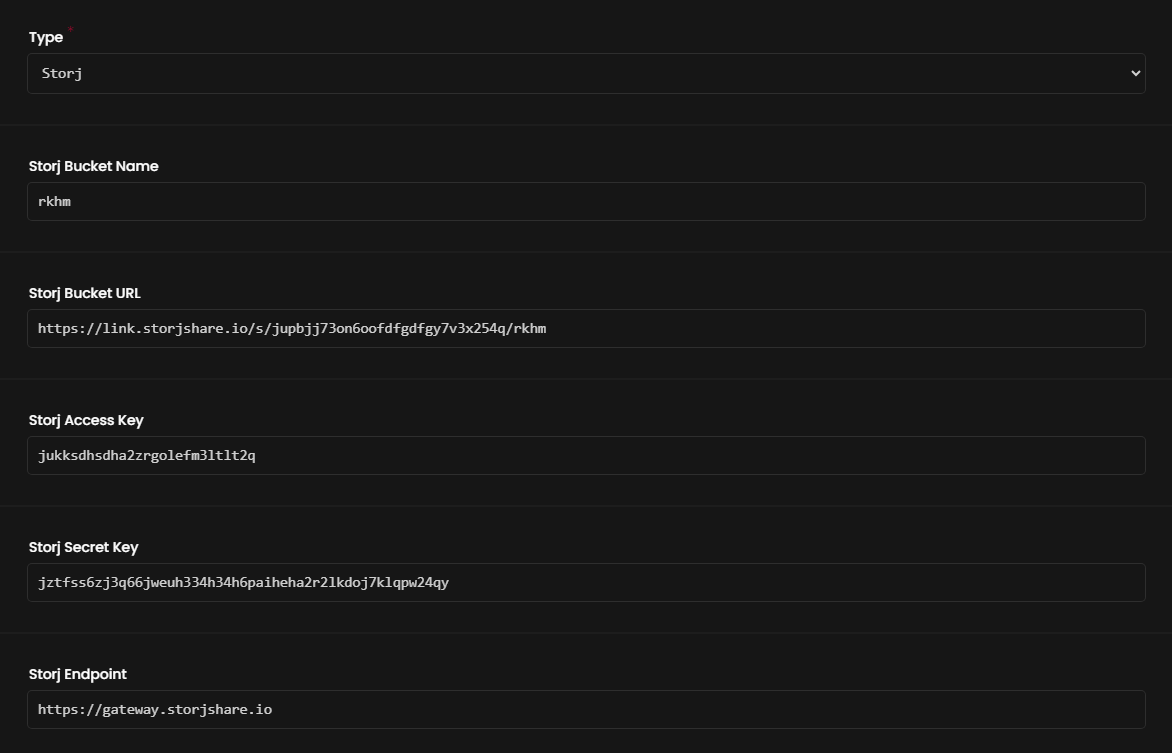
How to add Storj?
- Create a new project. Select on Continue with web. Click on Generate passphrase. Save your passphrase and click on continue
- In your project page, go to Buckets page and create a new bucket. You can enter any name
- Go to Access page and click on Create S3 Credentials. Enter any name, select S3 Credentials only, give all permissions and continue until your S3 credentials are presented too you. Copy Access key, Secret key & Endpoint
- Go back to Buckets page. Find your bucket. Click on 3-dots. Click on Share bucket. Copy your bucket URL
- Go to RKHM's `Admin -> Setting -> Files -> Storage Servers` and click on `+ New Item`
- Enter any name, choose Storj from `Type` option. Enter required information and click on `create`
- Go to RKHM's `Admin -> Setting -> Files -> Storage Setting` and set your new storage as default storage for ALL files or set it for whatever you like
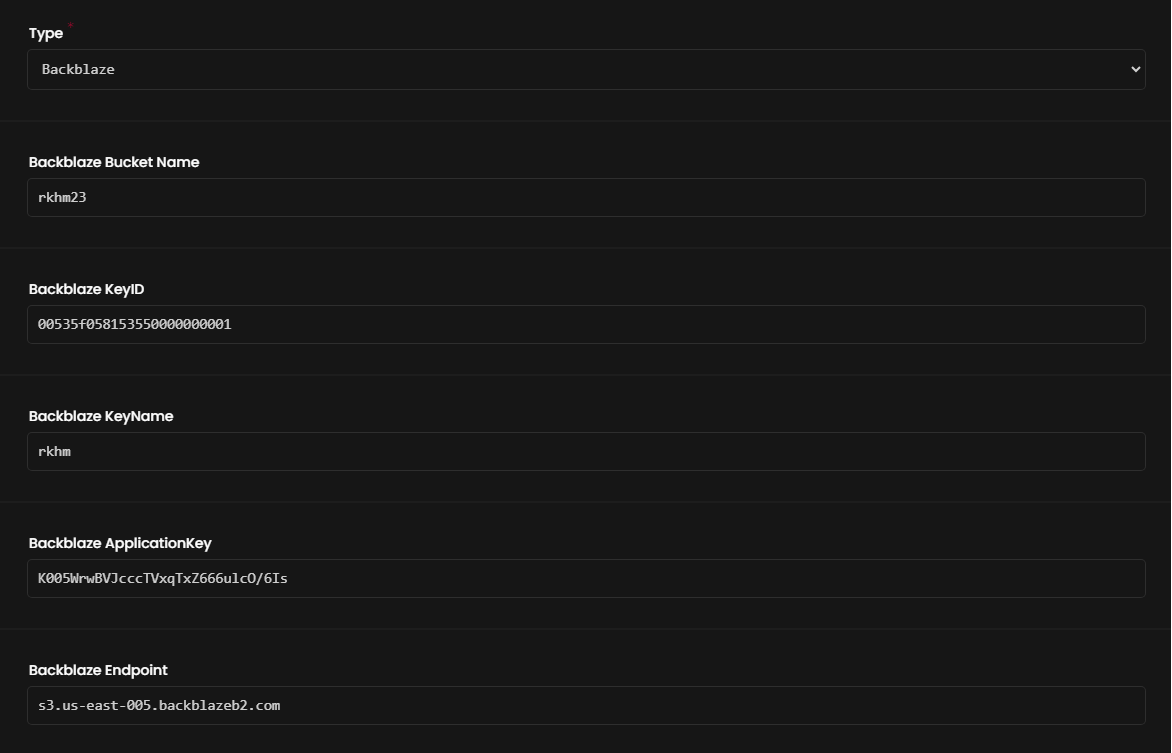
How to add Backblaze?
- Click on Create a bucket in your Backblaze dashboard. Enter any name. Select Public for Files in Bucket are: and disable Object Lock
- After you bucket is created, find it in Buckets page, find and copy Endpoint then click on CORS Rules. In pop-up, either enter your website address or select Share everything in this bucket with every origin and update rules
- Go to Application Keys page and click on Add a New Application Key. Enter any name and click on Create new key. Copy keyID, keyName and applicationKey
- Go to RKHM's `Admin -> Setting -> Files -> Storage Servers` and click on `+ New Item`
- Enter any name, choose Backblaze from `Type` option. Enter required information and click on `create`
- Go to RKHM's `Admin -> Setting -> Files -> Storage Setting` and set your new storage as default storage for ALL files or set it for whatever you like
How to add Cloudflare R2?
- Create an R2 bucket and an R2 API token with object read/write/delete permissions. Save its Access Key ID and Secret Access Key, and find your Cloudflare account ID. R2 credentials guide.
- In the bucket Settings, connect a custom domain for production public delivery. The r2.dev Public Bucket URL can be used for testing, but is rate limited. Copy the public URL from that screen. The S3 API endpoint ending in r2.cloudflarestorage.com is for authenticated API requests and is not the public delivery URL. Public bucket guide.
- In RKHM Admin → Setting → Files → Storage Server, create a Cloudflare storage. Enter bucket, keys, account ID, optional jurisdiction, and the public URL in the Public Bucket URL field. RKHM builds the API endpoint from the account ID.
- Use Test to upload a sample object and open its returned URL. Then set the storage as default under Storage Setting if desired.
How to add CDN77?
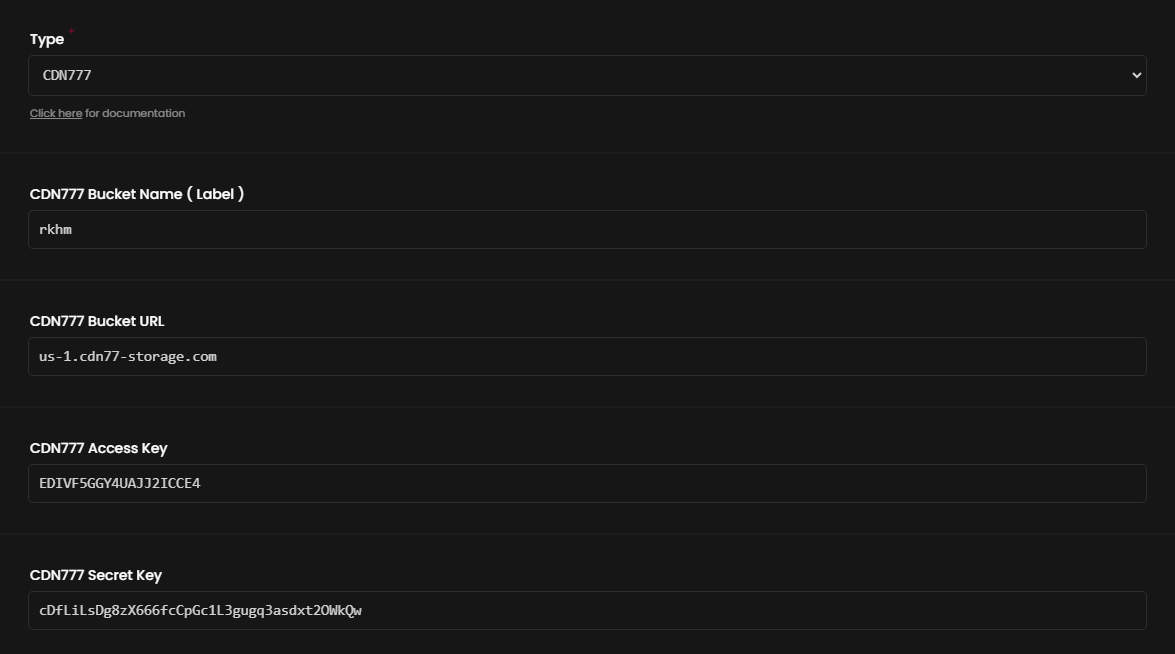
- Create a CDN77 Object Storage bucket and save the bucket name, storage cluster (EU-1, US-1, or EU-3), Access Key, and Secret Key. CDN77 setup guide.
- Link the bucket to a CDN Resource, then copy the CDN URL from that Resource’s details. This delivery URL is different from the S3 API endpoint. RKHM derives the S3 endpoint from the selected storage cluster. CDN connection guide.
- In RKHM Admin → Setting → Files → Storage Server, create a CDN77 storage. Select the storage cluster, enter bucket and keys, and put the CDN URL in CDN Resource delivery URL. Do not enter the bucket’s S3 endpoint as the delivery URL.
- Use Test, open the returned CDN URL, and then select the storage under Storage Setting if desired.
How to add DigitalOcean?
- Create a Space, choose its region, and create a Spaces access key. Spaces access guide.
- In Setting → Files → Storage Servers, choose DigitalOcean Spaces. Enter Space name, region code (for example nyc3), access key, and secret. RKHM builds the S3 endpoint. Select Space origin URL or Spaces CDN URL in Delivery address; choose CDN only after enabling it in DigitalOcean. A custom delivery URL can override either choice.
- Make objects publicly readable through the Space settings or an appropriate policy. Use Test and open its returned URL before making it the default storage.
How to add Hetzner Object?
- Create a bucket in Falkenstein (fsn1), Nuremberg (nbg1), or Helsinki (hel1), and create an access key. Hetzner overview.
- In Setting → Files → Storage Servers, choose Hetzner Object Storage. Enter the bucket and keys and select its location. RKHM builds the S3 endpoint and default public object URL. A custom delivery URL is optional.
- Configure public read access for files you intend to serve, then use Test and open its returned URL.
How to add Oracle Cloud?
- Create an Object Storage bucket, find your namespace and region identifier, and create a Customer Secret Key for S3-compatible access. OCI S3 compatibility guide.
- In Setting → Files → Storage Servers, choose Oracle Cloud Object Storage. Enter bucket, namespace, region, access ID, and secret. RKHM builds the S3 compatibility endpoint. Its default delivery URL uses the native OCI Object Storage path; you may enter a custom delivery URL instead.
- Set the bucket to public read if its files should be reachable without credentials. Use Test and open its returned URL.
How to add Azure Blob?
- Create a storage account and container. Copy an account key from Access keys. This integration uses the account key for Blob REST upload, check, and delete. Shared Key guide. Shared Key authorization must be enabled on the storage account; this adapter supports files up to Azure’s 5,000 MiB single Put Blob limit.
- In Setting → Files → Storage Servers, choose Azure Blob Storage. Enter account name, container name, and the base64 account key. RKHM builds the Blob endpoint and default object URL. A custom CDN delivery URL is optional.
- If RKHM must return publicly readable URLs, allow anonymous blob access on the account and set the container access level to Blob, or use a delivery service that exposes the files. Azure public access guide. Use Test and open its returned URL.
How to add Google Cloud?
- Create a Cloud Storage bucket and an HMAC key for a service account. RKHM uses the Cloud Storage XML API through its S3 interoperability endpoint. GCS interoperability guide.
- In Setting → Files → Storage Servers, choose Google Cloud Storage. Enter bucket name, HMAC access ID, and HMAC secret. RKHM uses the fixed storage.googleapis.com endpoint and builds the default public object URL; a custom delivery URL is optional.
- Grant public object read access to the bucket if RKHM should return anonymous URLs. Use Test and open its returned URL.
How to add MinIO?
- Install MinIO on your server/cloud ( Many guides available online, unrelated to RKHM )
- Visit MinIO Console ( Usually http://your-server-ip:9001 )
- Create a new user and give it readWrite access
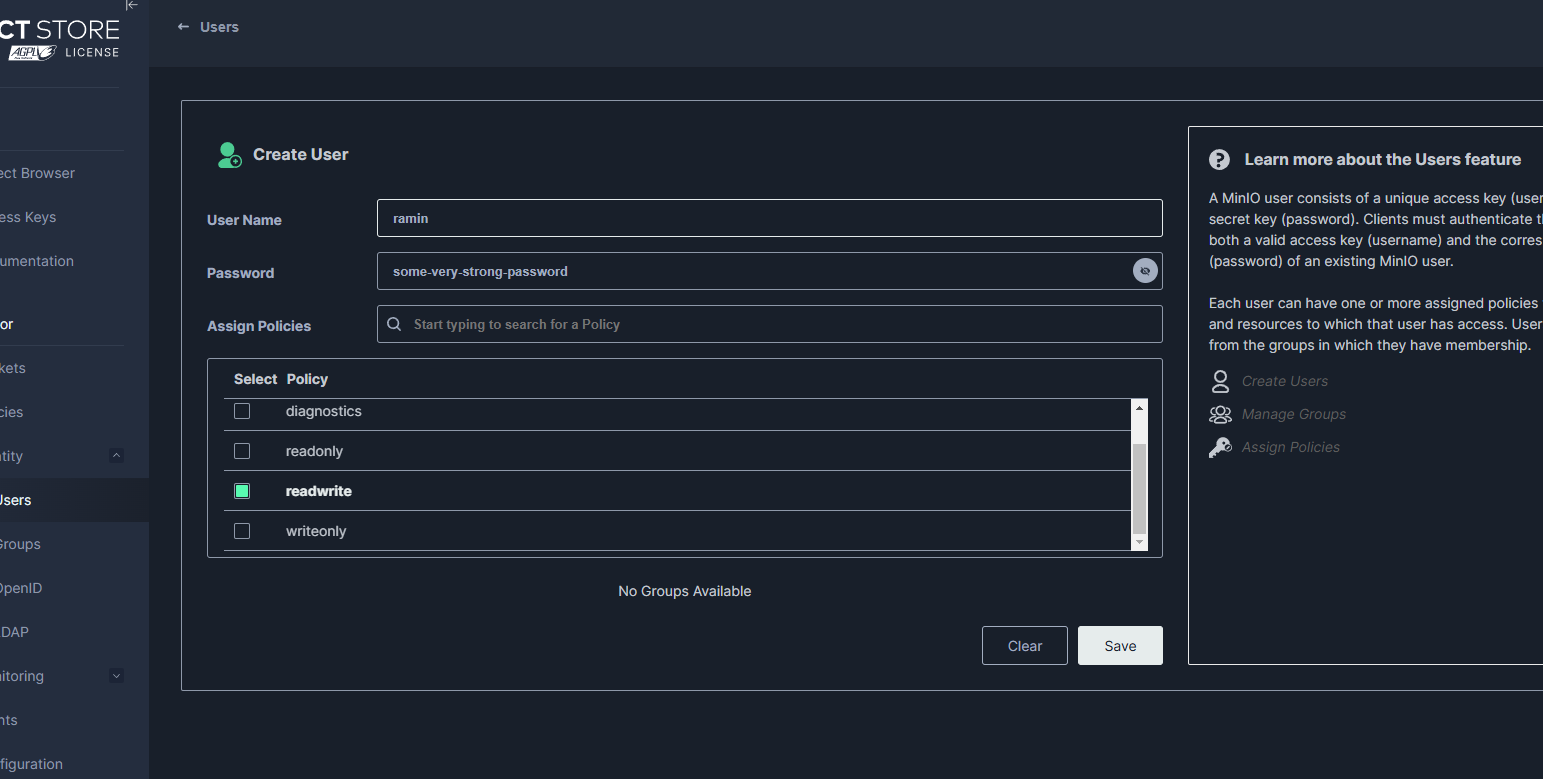
- Edit newly created user. Select Service accounts
- Click on Create Access Key and create credentials for user ( Don't forget to copy them! )
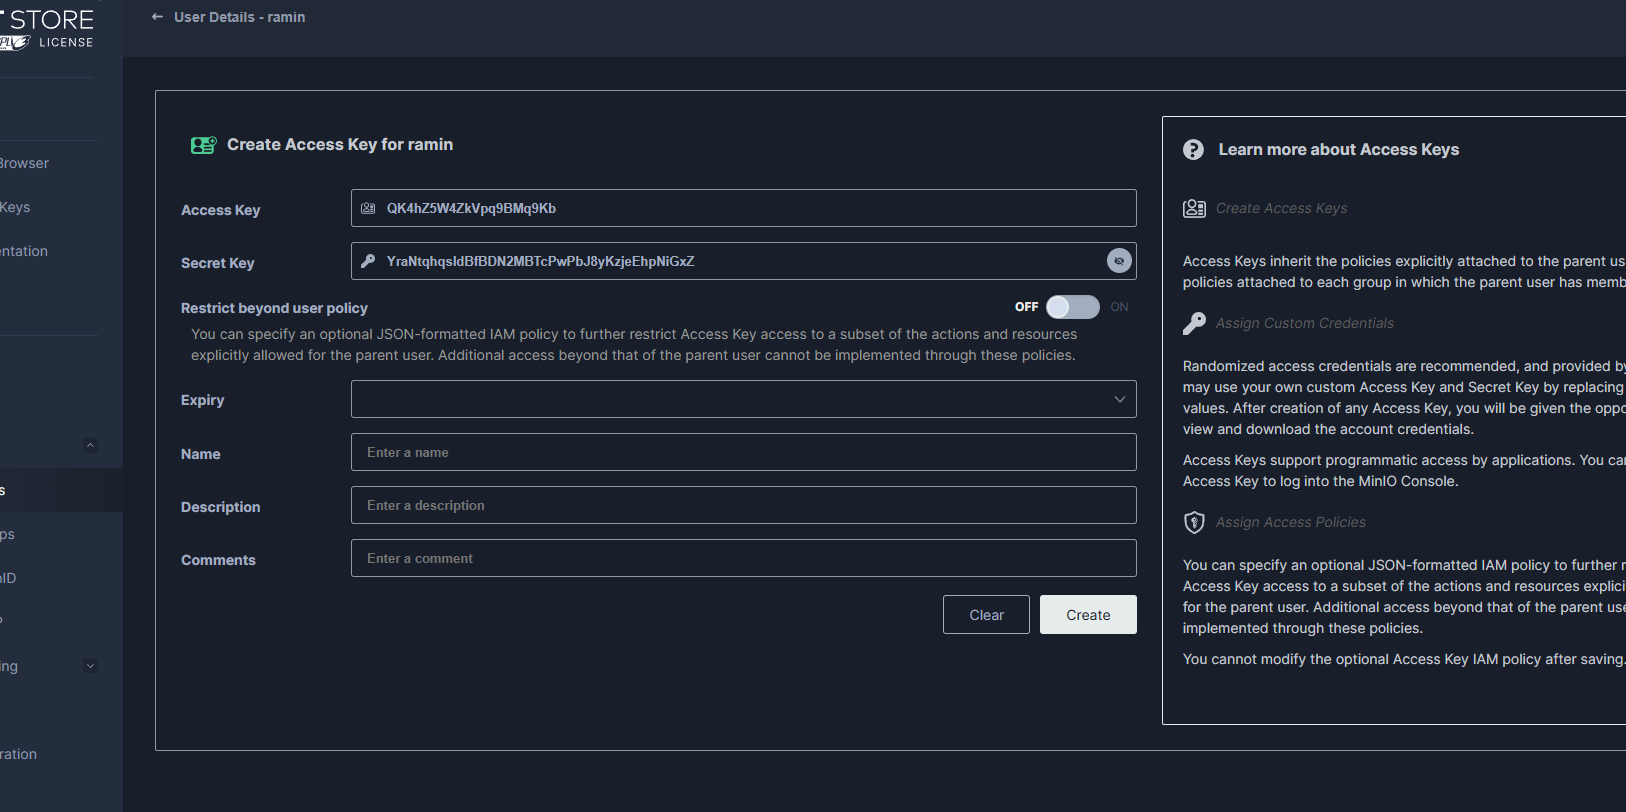
- Now create a new bucket ( copy the name )
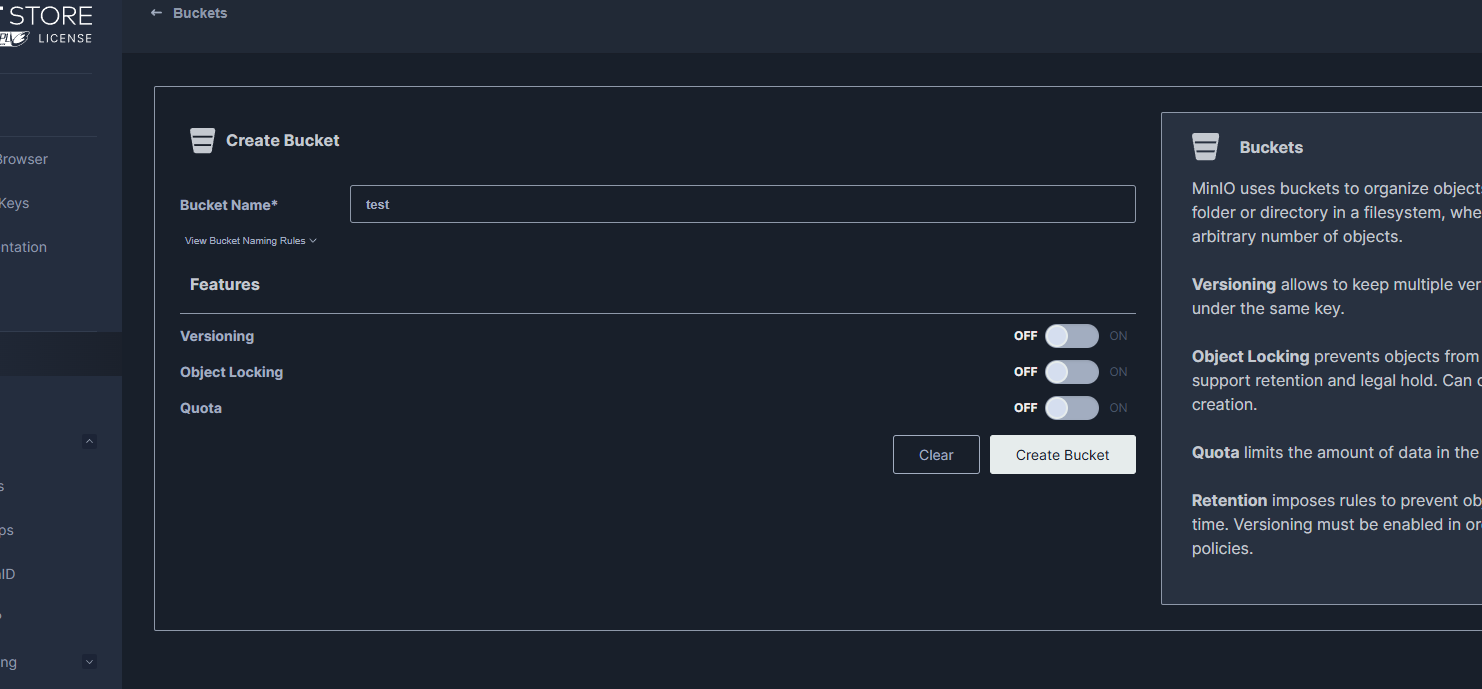
- Edit newly created bucket
- Select Anonymous Access and click on Add Access Rule
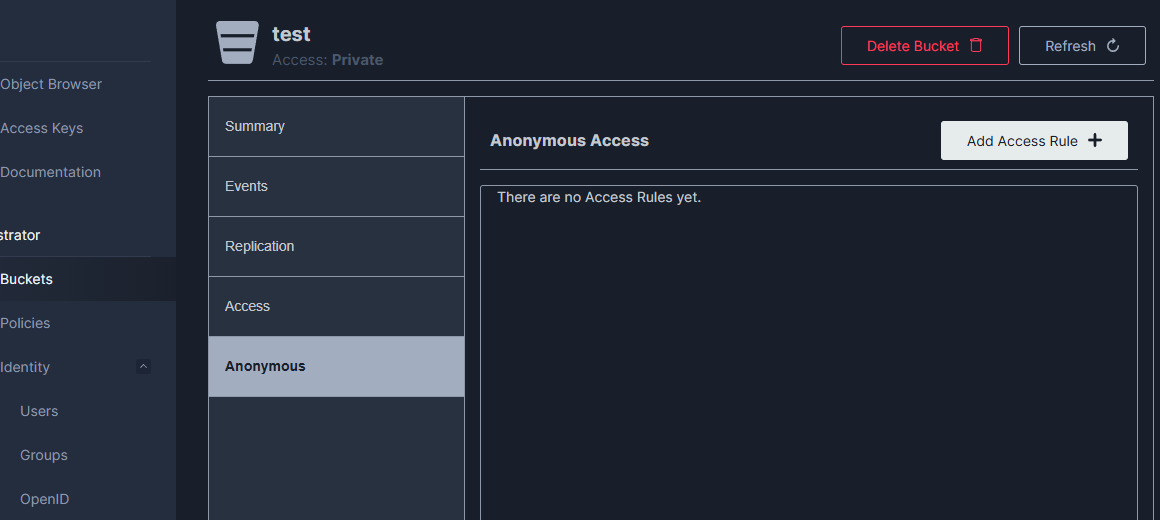
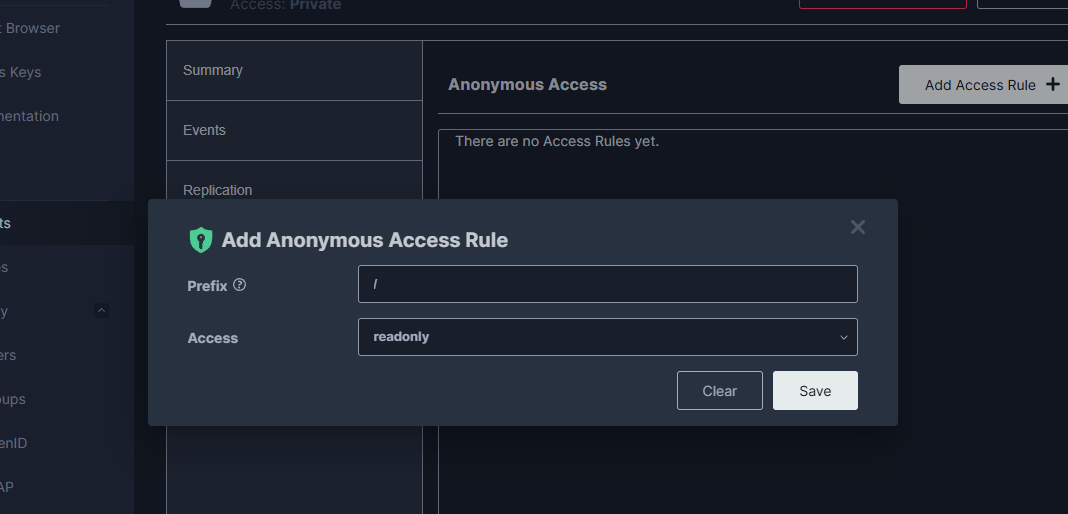
- Enter / as Prefix
- Select readonly as Access
- Click on Save
- Go to RKHM's `Admin -> Setting -> Files -> Storage Server` and click on `+ New Item`
- Enter any name, choose MinIO from `Type` option. Enter required information and click on `create`
- Your MinIO URL probably is http://your-server.com:9000
- Go to RKHM's `Admin -> Setting -> Files -> Storage Setting` and set your new storage as default storage for ALL files or set it for whatever you like