



Installing RKHM on GoDaddy Web Hosting (cPanel)
cPanel setup, PHP, cron, and shared hosting limits
This guide covers GoDaddy Web Hosting (cPanel) on Linux. It follows RKHM's standard installation steps and the general cPanel guide, with GoDaddy's account screens, file paths, PHP controls, and hosting limits. GoDaddy Websites + Marketing, Managed WordPress, Windows Plesk, and VPS products have different controls; use the corresponding RKHM platform guide for those products.
Before you upload
- Have the complete RKHM release ZIP, purchase code, domain, and a GoDaddy Web Hosting (cPanel) account. Choose the final site hostname before activating the licence.
- Confirm that the plan provides PHP 8.3 or newer (RKHM requires it since v2.1.04), the extensions shown in RKHM's Requirements page, a MySQL database, Cron Jobs, working
.htaccessrewriting, and enough disk, memory, and process capacity for your library. - GoDaddy's shared hosting upload limit lists 32 MB by default and 128 MB as the maximum for Web Hosting (cPanel). Plan another hosting tier if RKHM visitors need larger direct uploads. The CPU, RAM, and inode limits also matter for media-heavy sites.
1. Open the correct site and document root
From the GoDaddy product page, choose Web Hosting → Manage for the right account. In the account Dashboard, open cPanel Admin or use the website's File Manager shortcut. GoDaddy's File Manager instructions show the current route.
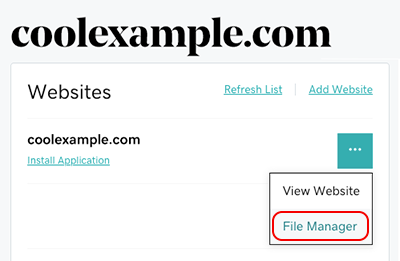
GoDaddy's File Manager shortcut. Screenshot: GoDaddy Help.
For the primary domain, GoDaddy identifies /public_html as the website root. Addon domains and subdomains may have a different root; check its Document Root under cPanel Domains instead of guessing. See GoDaddy's root directory guide. Record the full server path shown in File Manager, such as /home/USERNAME/public_html; the cron job will need it.
2. Select PHP and check upload settings
In the GoDaddy dashboard, open Settings → Server Settings → PHP Version → Change, choose PHP 8.3 or newer (RKHM requires it since v2.1.04), and save. GoDaddy's PHP version guide shows the account control. Then open cPanel Admin → Software → Select PHP Version to enable any missing extensions shown by RKHM's installer. GoDaddy documents the extension checkboxes.
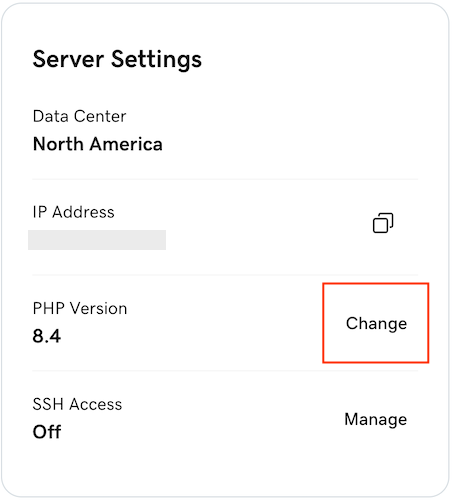
The dashboard PHP Version setting. Screenshot: GoDaddy Help.
Set upload_max_filesize and post_max_size under Select PHP Version → Switch To PHP Options if the default does not fit your content; keep post_max_size at least as large as the intended upload. GoDaddy's upload settings guide shows this screen. The plan maximum still applies, and timeouts or resource use can stop an upload below that maximum. Use RKHM's Requirements step to verify the effective settings.
3. Upload RKHM and preserve its .htaccess files
Use File Manager in the correct document root. Upload the complete RKHM release ZIP, then extract it there. The document root must directly contain index.php, api/, admin/, and installer/. If they landed in an extra package folder, move the contents into the root. GoDaddy recommends uploading a ZIP for many files in its upload guide.
In File Manager, choose Settings → Show Hidden Files (dotfiles) and save. Confirm RKHM's supplied .htaccess files exist in the root and protected subdirectories. GoDaddy's dotfiles guide shows this setting. RKHM checks the exact supplied files and their rewrite behavior; keep them intact. If cPanel adds a PHP handler to one of them after a PHP version change, move that setting into the provider's PHP controls with host support and restore the original RKHM file.
4. Create the database and enable HTTPS
In cPanel Admin → Databases → MySQL Database Wizard, create an empty database and a user with a strong password, then grant the user all privileges on that database. Save the complete database and user names, including any cPanel prefix. GoDaddy's database guide covers this wizard. In RKHM's Database step, use the host supplied by GoDaddy (often localhost) and those saved credentials.
Point the final hostname to this hosting account. If Cloudflare manages your DNS, find the hosting IP under Dashboard → Settings → Server as described by GoDaddy's IP address guide, then set the Cloudflare A record for @ or your chosen subdomain. The Ubuntu guide's Cloudflare section explains apex and subdomain records. Keep the site record DNS only while installing and checking the origin.
Enable HTTPS for the exact hostname before entering RKHM's final site URL. GoDaddy documents AutoSSL for eligible domains and manual SSL installation. Confirm the certificate actually covers your hostname and the browser shows a valid HTTPS connection. GoDaddy's manual Let's Encrypt route requires renewal work; see its renewal warning.
5. Add the RKHM cron job
At RKHM's Server step, copy the cron command generated for this installation. In cPanel Admin → Advanced → Cron Jobs, set it to run once per minute if your plan allows that interval, paste the command, and select Add New Cron Job. GoDaddy's cron guide uses /usr/local/bin/php for PHP scripts. Your command should resemble this, with your real account name and path:
/usr/local/bin/php -f /home/USERNAME/public_html/api/admin.php bof_cronjobs=yesUse the command and full script path RKHM reports; the example assumes the primary domain's public_html root. Check that the CLI PHP version matches the website version. Let the task run for a minute or two and refresh RKHM's Server step. If it fails, check the cron schedule, path, PHP binary, and cron mail or error output. Do not use a public web request as a substitute for RKHM's CLI command.
6. Complete installation and decide whether this plan fits
Finish the licence and installer steps, remove the installer directory when prompted, and complete First run. Confirm that the home page, admin login, API routes, an upload under the plan's limit, and the cron check work over HTTPS. Use GoDaddy's Backup Wizard or account backup feature, and keep a recoverable copy of both database and files.
Shared Web Hosting resource and upload limits can affect a media-heavy RKHM site, especially with video processing, a large library, or optional services. Check current plan resources before enabling FFmpeg, Meilisearch, yt-dlp, or Node.js. For a server where you control those packages and long-running services, use the Ubuntu VPS guide instead.